Today for my come-back post (hopefully), I’ll be talking about a tip for your UITableViewDataSource and UITableViewDelegate. The idea is in fact applicable to a lot of other things following the same delegate pattern, but the use case of UITableView will hopefully be the most concrete example for most people.
The idea
A lot of developers, me included, have taken the habit of making your UIViewController the delegate and dataSource of their UITableView. That’s all good and fine, but in effort to minimize the code size of your UIViewController (you know, that Massive-View-Controller thing all we want to avoid) and limit the responsibility of your UIViewController (separation of concern), there’s a better solution.
The general idea is in fact very simple: extract your UITableViewDataSource and UITableViewDelegate into a separate object. And make e.g. your UIViewController retain that object and set it as the tableView’s delegate and dataSource.
In practice, you can move all the responsibility to a single object (making it both the delegate and dataSource, and making it the responsibility to provide the cells), or you can make that separate objects (one for delegate, one for dataSource), or you can make that separate object just be a proxy, that will be reusable for multiple ViewControllers, and delegate more simple queries to each UIViewController using it to customize just the right things.
Concrete example
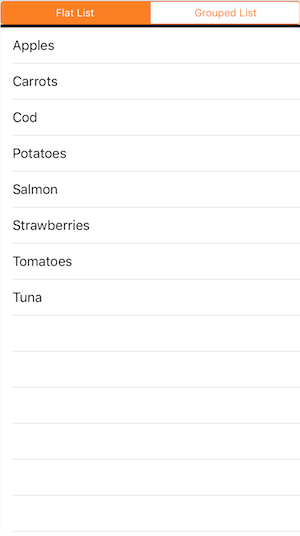
Let’s start with a very simple example: a list of products.
struct Product {
  let name: String
  let category: String
  let price: Double
}
Splitting your DataSource into a dedicated type would look like that:
class ListDataSource: NSObject {
  let products: [Product]

  init(products: [Product]) {
    self.products = products
  }

  func product(at indexPath: IndexPath) -> Product {
    return self.products[indexPath.row]
  }
}

extension ListDataSource: UITableViewDataSource {
  func numberOfSections(in tableView: UITableView) -> Int {
    return 1
  }
  func tableView(_ tableView: UITableView, numberOfRowsInSection section: Int) -> Int {
    return self.products.count
  }
  func tableView(_ tableView: UITableView, cellForRowAt indexPath: IndexPath) -> UITableViewCell {
    return cell(for: product(at: indexPath))
  }

  func cell(for product: Product) -> UITableViewCell {
    // Of course in a real project we'd dequeue a custom cell from tableView, etc.
    let cell = UITableViewCell()
    cell.textLabel?.text = product.name
    return cell
  }
}
And then you’ll use it this way in your UIViewController:
class DemoViewController : UIViewController {
  var tableView: UITableView!

  var currentDataSource: UITableViewDataSource? {
    didSet {
      self.tableView.dataSource = currentDataSource
      self.tableView.reloadData()
    }
  }

  override func viewDidAppear(_ animated: Bool) {
    super.viewDidAppear(animated)
    let products = loadProducts()
    self.currentDataSource = ListDataSource(products: products)
  }
}
In that very simplistic example, the benefits might not seem very visible at first, especially because for now our DemoViewController doesn’t do much yet. But in a real world example where that DemoViewController probably does a lot more — like some logic specific to your app, or handling any @IBAction you have on the rest of your screen, etc — I hope you can see how at least extracting all the UITableView display logic would help here.
It’s also generally easier to reason about, as all the logic about the display of that DataSource is now extracted in its dedicated file & class, instead of it being mixed with the rest of the code of your UIViewController, and that separation will probably help you when tweaking or editing the way the UITableView should display its data, by focusing on one specific and isolated file, instead of scrolling amongst other unrelated code.
Retain your DataSources!
One tricky thing however when you put your dataSource in a dedicated, separate object, is to not forget to retain it.
The dataSource property on UITableView is weak (as all dataSources and delegates should be), so if you just affect tableView.dataSource to a newly created ListDataSource(…) without retaining it, that ListDataSource instance will then be released from memory and your UITableView will go back to being empty.
So when you use that trick, just don’t forget to retain your object serving as DataSource. In the example above, I made the DemoViewController retain it by using a var currentDataSource property, and used that occasion to use a didSet on it to propagate it to the tableView and reload it afterwards.
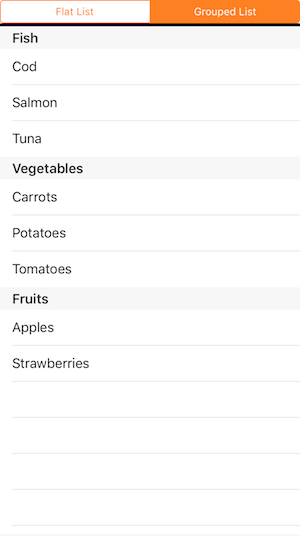
Improving the DataSource
Now, imagine that without changing your app’s logic itself, you just wanted to adjust the way the list of products were displayed, e.g. group your products in sections according to their category.
All you’d have to do is to modify the implementation of your DataSource class, without changing anything in your DemoViewController!
But let’s take that one step further: instead of modifying the existing DataSource, let’s keep it but also duplicate it to create a new one (SectionDataSource below). By keeping both of them, we’ll then be able to switch between the two at runtime later!
So let’s create our new SectionDataSource, very similar to the first one, but which now handles sections:
class SectionsDataSource: NSObject {
  struct Section {
    let title: String
    let items: [Product]
  }
  let sections: [Section]

  init(products: [Product]) {
    // Dispatch products into a dictionary according to their category
    let groups = Dictionary(grouping: products, by: { product in product.category })
    // Convert that dictionary into an array of Sections, then sort it by section title
    self.sections = groups.map(Section.init).sorted(by: { $0.title < $1.title })
  }

  func product(at indexPath: IndexPath) -> Product {
    return self.sections[indexPath.section].items[indexPath.row]
  }
}

extension SectionsDataSource: UITableViewDataSource {
  func numberOfSections(in tableView: UITableView) -> Int {
    return self.sections.count
  }
  func tableView(_ tableView: UITableView, titleForHeaderInSection section: Int) -> String? {
    return self.sections[section].title
  }
  func tableView(_ tableView: UITableView, numberOfRowsInSection section: Int) -> Int {
    return self.sections[section].items.count
  }
  func tableView(_ tableView: UITableView, cellForRowAt indexPath: IndexPath) -> UITableViewCell {
    return cell(for: product(at: indexPath))
  }

  func cell(for product: Product) -> UITableViewCell {
    let cell = UITableViewCell()
    cell.textLabel?.text = product.name
    return cell
  }
}
And now that we have our new SectionsDataSource class, all we have to do in our DemoViewController is… replace the self.currentDataSource = ListDataSource(products: products) line by self.currentDataSource = SectionsDataSource(products: products), and that’s all!
See how everything continues to work, while the majority of your changes was located in a dedicated file and your ViewController was barely affected. That also helps to focus your editing in one specific class in a single file, instead of finding in a Massive ViewController which lines to modify.
Switching DataSources
Now that we have both ListDataSource and SectionsDataSource, we can easily imagine switching them at runtime.
You could just add a UISegmentedControl or similar to your UI, and depending on which segment gets selected, you’d set self.currentDataSource to either ListDataSource(products: products) or SectionsDataSource(products: products), and that’s all!
Imagine if you had to do all that logic in your DemoViewController directly instead of having separate objects… That would very likely mean:
- A lot of
iftests insidenumberOfRowsInSectionandcellForRowAtIndexPathmethods to return different things depending on the mode (flat list or sections by categories) - Be sure to make those
ifconditions consistent (have the same conditions and branches innumberOfRowsInSectionandcellForRowAtIndexPathso that the count returned in one matches the object index used in the other) - Either two properties to hold the data (an array of Products for the flat list, and an array of Sections for the sectionned list mode), or just use an array of Sections and trick the logic by using an array with only one section in the case of the flat list… not very consistent and readable months later anyway…
A lot could go wrong in this setup, from mismatching the conditions in different methods you have to implement to having to focus on understanding the logic as a whole and understand the big picture at once to see how everything works together, with risks of inconsistencies along the way.
But instead, because we separated the concerns of the UITableViewDataSource in their own classes, it’s all easier to read and reason about!
Going further
From there we can go way further and improve this a lot:
- Of course we can imagine adding more and more classes for displaying your
UITableViewdifferently - But we could also imagine make those DataSources generic over a type
T(instead of using them only for theProducttype) to reuse them to display other types elsewhere in our application - We could then accept a closure in the
initofSectionsDataSource<T>to tell how to extract the section name (String) for eachT(where before we hardcoded that it wasproduct.category) - We could extend the idea to
UITableViewDelegate - We could allow to customize the cells
UITableViewDelegate
For extending the idea to UITableViewDelegate, you could go multiple ways:
- You could either imagine making your existing classes extend
UITableViewDelegate, so that you’d use the same dedicated object for both being thedataSourceand thedelegateof yourtableView:extension SectionsDataSource: UITableViewDelegate, etc. - Or you could decide to use an entirely separate object again, so you’d have one dedicated object for your
tableView.dataSource, and a different one to use as yourtableView.delegate
Both options are valid, it depends of your needs and what your dedicated implementations are doing. The fact that for UITableView, the delegate and dataSource are often closely related might make you go towards the first solution though 1.
Also, imagining you go with the first route (use the same object for dataSource and delegate), you could give closures to that object on init to tell it what to do especially when a Product is selected, then forward delegate method to call that closure:
// let onProductSelected: (Product) -> Void
extension ListDataSource: UITableViewDelegate {
  func tableView(_ tableView: UITableView, didSelectRowAt indexPath: IndexPath) {
    self.onProductSelected(product(at: indexPath))
  }
}
Once again, the benefit of that is, if you do the same on the SectionsDataSource, then just switching your currentDataSource from ListDataSource to SectionsDataSource wouldn’t require to change your ViewController, which would still work as expected, even if in one case the list is flat and in the other it’s structured in sections!
That’s because now your DataSource object, whichever one is used, is responsible for translating your IndexPath into Product instances, so that you don’t have to care about how those products are organized in the DataSource, all you have to implement in your ViewController is what to do when a given Product is selected (instead of when a given IndexPath is selected), abstracting away all that IndexPath->Product translation logic out of your ViewController.
Allowing custom cells
For allowing custom cells to be provided by the outside (i.e. being able to use the same ListDataSource for different tableViews which are using different cells, without having to duplicate ListDataSource for each cell type), once again you have multiple solutions, some of them being:
- Provide a
cellFactoryclosure to your DataSource classes atinit, to tell how to build and return anUITableViewCellfrom aProduct - Provide the cell class to use to instantiate each cell (alongside its
cellIdentifier), but make it sure that cell class conforms to some protocol declaring a method likefunc fill(with product: Product)that your cell class would have to implement, and that yourListDataSourceandSectionsDataSourcewould call after instantiating the cell to populate it - Make your DataSource classes themselves have a
delegateproperty of some custom protocol type (e.g.protocol CellProvider), and conform to that protocol to implement how to build and fill a cell with aProduct
There are probably other ways to let your UIViewController tell how to build each cell for cases where you want that flexibility, all being quite similar in concept, but I hope that gives you some interesting ideas.
Explore & Playground
It’s time for you to play with all those concepts yourself! Especially the ones I didn’t detail much in that last part (Generics, etc) could be interesting to explore on your own. But if you’re curious about my take on one possible solution, I’ve attached a playground for you to browse the code we discussed — and even a solution using Generics so those DataSources are reusable for types other that Products in other places in the same app.
Also, keep in mind that this idea we just applied is indeed well suited for UITableViewData & UITableViewDelegate, but can also be used for other delegate patterns as well 😉
Happy Swifting!
-
For example, the
titleForHeaderInSectionfunction is in theUITableViewDataSourceprotocol, but theviewForHeaderInSectionfunction is in theUITableViewDelegateprotocol… go figure; also, they both expect the cells to be indexed the same way by yourIndexPaths, so using a delegate which assumes one way of organizing your data (e.g. in a flat list) and a dataSource which assumes another (e.g. in sections) probably wouldn’t fit well together ↩